Dimension Tables
Overview
Dimensions are a common concept in data analytics. By dimensions, we usually mean a set of properties that a user, product, or session may have. Examples of user properties:
- Country of origin
- Email addresses
- Primary email address
- Phone number
- Is paying
- First event time
- Last event time
- Sign-up time
- etc.
In addition to user profiles, you can configure a dimension table for any entity you've added on the Entities page.
Most companies store these properties in their data warehouse in separate tables, where each row holds information about a single entity. Later, during analysis, they join these tables to the event tables for further filtering and segmentation.
Mitzu supports joining one or more dimension tables to event tables.
Add new dimension table(s)
Click the Add dimension table button.
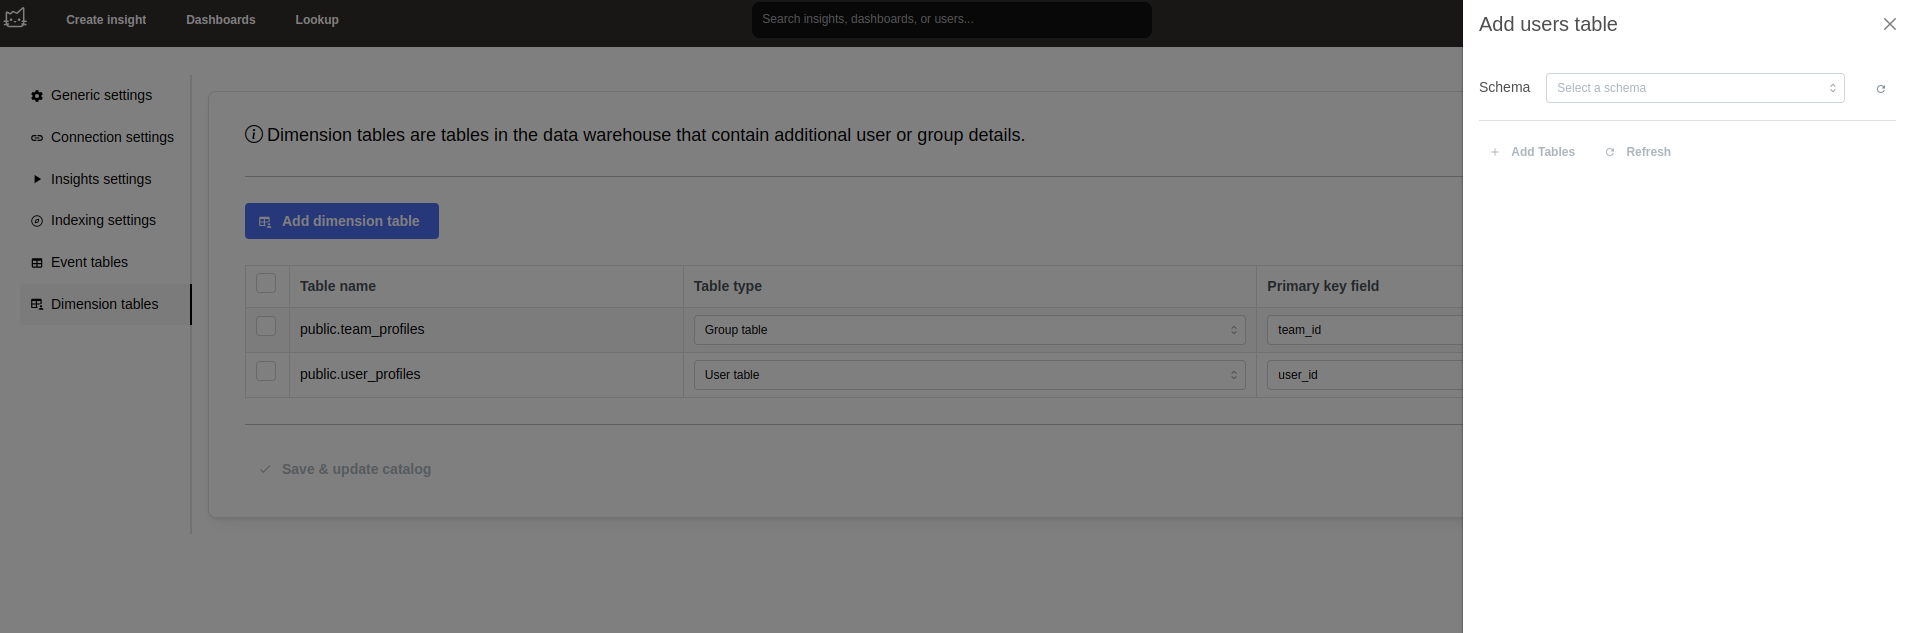
The modal loads the available schemas from the configured data warehouse connection. Once loading finishes, select the schema containing the table(s) you want to add. After you pick a schema, Mitzu loads every table name in it. You can then choose one or more tables to add, or pick the bold Add all <N> tables option to select them all (where <N> is the number of tables in the schema).
Once the tables are selected, you can choose the entity and enter the Primary key column.
For the Primary key field, set the column that can be used as a joining key when joining the event tables. For example, if you've selected the User entity, set the column that contains the user ID. Type the column name into the input and select it from the dropdown.
If you're unsure what columns are available, open the Primary key column dropdown and pick Fetch columns at the top of the list. It loads the available columns for all selected tables and populates the dropdown with the most common column names.
Fetching columns can take a long time if too many tables are selected.
Click the Add tables button to close the modal and add the new tables configured with the selected entity and primary key.
Configure dimension tables

You can update the Entity and the Primary key column in the table. Optionally, you can set Ignored fields to list the columns you don't want indexed.
The Display name prefix (optional) field adds a fixed label to the start of the display name of dimension properties that are newly indexed from this table. For example, with a prefix of User , a freshly indexed country_code property appears as User Country Code. Existing and manually renamed properties are left unchanged, and the prefix is limited to 20 characters. Leave it empty to keep the default display names.
Changes are saved automatically.
Newly added and reconfigured event tables are not indexed automatically. You need to select them and click the Index selected button to index them.
Table definition
Every row in the list shows a small info icon to the left of the table name. Click it to open the Table definition modal, which shows the CREATE statement Mitzu read from your warehouse for that table, syntax highlighted and with a copy button.
Mitzu stores the definition while indexing a table. If it has not read the definition yet, the modal says so and offers a Fetch definition button that queries the warehouse there and then and saves the result — no re-index needed. When a definition is already stored, the button reads Refresh definition and re-reads it, which is useful when the table changed since the last index.
Not every warehouse exposes the CREATE statement of a table or a view. When Mitzu cannot read one, the modal says so — as text if nothing is stored yet, or as a notification if a definition is already stored, which is always left untouched.
Only workspace administrators can open the table definition or fetch it from the warehouse.
Custom join condition
By default, Mitzu joins a dimension table to an event table on the dimension table's Primary key column. For most dimension tables this is what you want.
Some dimension tables, however, hold a separate row per entity per date (for example a daily_user_state table with user_id + date). Joining only on user_id duplicates the events. To handle these cases, the Configure dimension table modal exposes an optional Custom join condition text area:
- Reference event-table columns as
__evt_<column>and dimension-table columns as__dim_<column>. - Standard comparison and arithmetic operators are supported, as are SQL functions such as
date(...). - Both sides of the join must appear: at least one
__evt_*and one__dim_*placeholder. - The expression is parsed and validated before saving — invalid syntax or unknown placeholders surface an error in the modal.
The most common use is matching event timestamps against a dimension date column:
date(__evt_event_time) = __dim_date
Both = and == are accepted for equality — Mitzu normalizes them to the same operator internally.
Leave the field empty to keep the default primary-key join.
Custom join conditions are an advanced setting. Only use them when the dimension table contains time-varying rows that would otherwise duplicate events.
Removing user profile tables
If you decide to remove a dimension table, select it with the checkbox in the table and click the Remove tables button. This removes the table from the list of tables and from the user property catalog. All saved insights that use one of the removed tables will break.