Databricks
Overview
Mitzu connects to Databricks SQL warehouses with one of four authentication methods:
| Method | Who runs the queries | What the admin sets up |
|---|---|---|
| Personal access token | The token's owner | A personal access token |
| Workspace level access | A Databricks service principal | A federation policy on a service principal |
| Account level access | Each Mitzu user, via account federation | An account-wide federation policy trusting Mitzu |
| Personal OAuth | Each Mitzu user, with their own sign-in | An OAuth app connection in the Databricks account console |
Databricks cluster support
Mitzu supports all Databricks SQL Warehouse and cluster types. The recommended engines are Serverless SQL Warehouse and PRO SQL Warehouse.
Mitzu supports Databricks on all three major cloud infrastructure providers:
- AWS
- Azure
- GCP
Every method works on AWS, Azure and GCP workspaces.
Supported data types
Mitzu will map the types of the data warehouse based on the following table:
| Mitzu type | Data warehouse type |
|---|---|
| String | STRING |
| Number | BIGINT, DOUBLE, FLOAT, INT, SMALLINT, TINYINT |
| Boolean | BOOLEAN |
| Datetime | DATE, TIMESTAMP |
| Map | MAP |
| Struct | STRUCT |
| Array | ARRAY |
Getting connection information
-
Create an access token with read access to your experiment data and write access to the staging database.
-
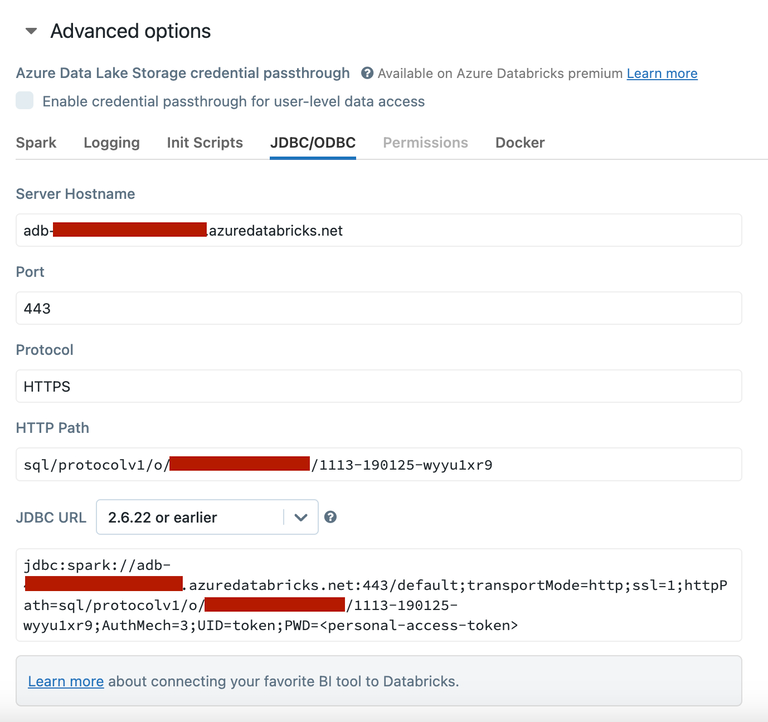
Follow the Databricks documentation to get the hostname and HTTP path of the cluster you'll use to run your experimental analysis. You may want to create a dedicated cluster for this use case.
-
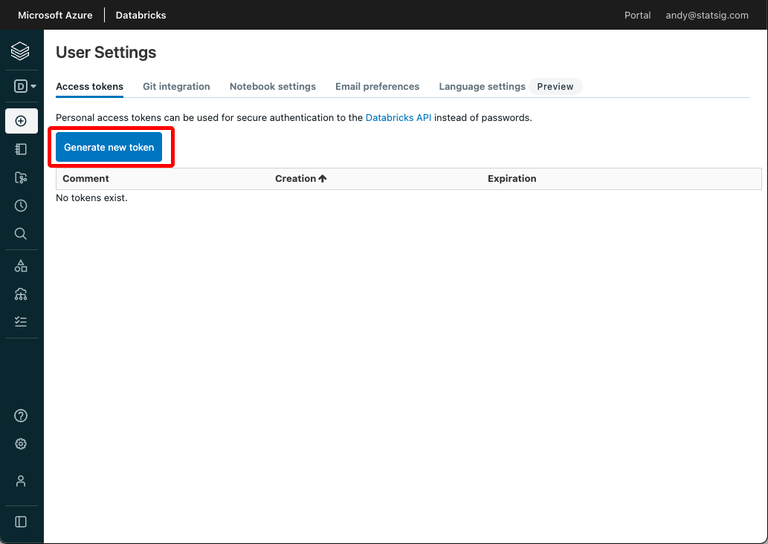
Follow these instructions to get the personal access token that Mitzu will use to calculate experiment results in your warehouse.
Configure the connection details in Mitzu
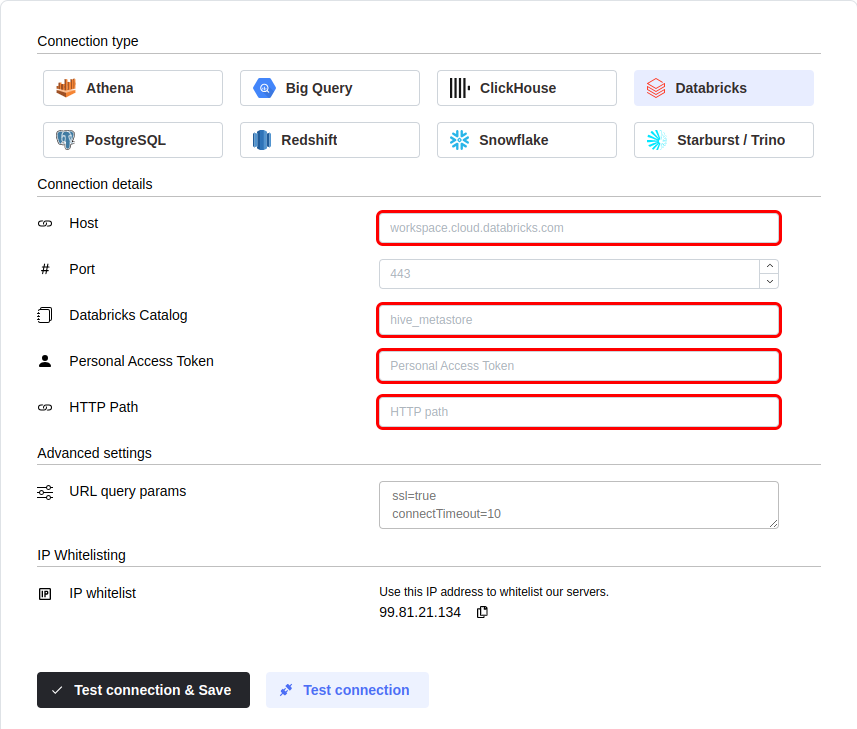
Add the connection information to Mitzu.
Personal OAuth
With Personal OAuth every Mitzu user signs in to Databricks once and consents to Mitzu querying on their behalf. Mitzu only stores the tokens users grant it, so every query, scheduled refresh and AI answer runs under the identity of the person who asked for it and shows up under that user in the Databricks query history. Choose this method when your security team does not want Mitzu to mint tokens for arbitrary users in your account.
Personal OAuth decides whose identity runs a query, not who sees its result. Insight results, dashboard cards, the event catalog and scheduled refreshes are shared across the workspace like with any other authentication method: a dashboard card is served from the stored result of whoever refreshed it, and a scheduled refresh runs as its owner. If members hold different Unity Catalog grants, the data one member can see depends on who ran the query last. Use Mitzu's own roles and workspace membership to control who sees what.
1. Create an OAuth app connection in Databricks
An account admin creates the app connection in the Databricks account console:
- Open the account console, then Settings → App connections → Add connection.
- Name the connection, for example
Mitzu. - Paste the Redirect URL shown on the Mitzu connection form (it looks like
https://app.mitzu.io/api/databricks/oauth/callback). - Under Access scopes select SQL (the
offline_accessscope is always allowed, Mitzu needs it for refresh tokens). - Tick Generate a client secret.
- Set the Refresh token TTL to the longest value your policy allows. We recommend 129,600 minutes (90 days); users have to sign in again when it expires.
- Save and copy the Client ID and the Client secret. The secret is only shown once.
Changes to app connections can take up to 30 minutes to become active on the Databricks side.
2. Configure the connection in Mitzu
- On the workspace Connection tab pick Databricks, then OAuth as the authentication method and Personal OAuth as the authentication level.
- Fill in the host, HTTP path and catalog as usual, then paste the client ID and client secret. The secret is stored encrypted and is never shown again. Users' Databricks tokens are always stored encrypted too, so a self-hosted Mitzu needs
SECRET_ENCRYPTION_KEYset before anyone can sign in with Personal OAuth. - Click Test connection & Save. Mitzu sends you to Databricks to sign in with your own account, validates the connection with your token, and saves the settings.
Changing the host or the client ID, or switching to another authentication method, deletes every stored user sign-in for the workspace.
3. Members connect their own account
The first time a member runs an insight or opens a catalog page on the workspace, Mitzu shows Connect your Databricks account instead of running the query. Clicking Connect Databricks account sends them through the Databricks sign-in and consent screen and returns them to the page they started from.
Every user can check their status, reconnect or disconnect on the workspace settings page: admins on the Connection tab, everyone on the Personal settings tab. Disconnecting deletes the stored tokens immediately.
What happens when a sign-in expires
Access tokens are refreshed automatically. When a user's refresh token expires or is revoked, their next query shows the connect prompt again, and any scheduled refresh, alert or dashboard report that belongs to that user fails with a message naming who needs to reconnect. The AI agent and the MCP tools return the same message together with the link to connect.
Removing a user from the organisation deletes their stored tokens.
You can configure the connection query parameters. To do so, click on theAdvanced settings section and enter your parameters into theURL Query Params textbox. You must write each parameter in a new line in the <parameter name>=<parameter value> format.
Click the Test connection button to check if Mitzu can connect to your data warehouse using the entered values.
SELECT 1;command. You may need to grant further permission Mitzu to see and query your data tables.To save the settings, click the Test connection & Save button.
Next steps
Once the connection is tested an saved the event end dimension tables can be configured. Please follow the setting up event tables guide.